
See also:
Stereophotography requires that the subject(s) be seen along two different axes. The optimal angle between these axes, such that the visual cortex can make its best judgments about the relative position of objects in space, seems to be about 4 degrees.

A little bit of trigonometry from this observation yields the 30:1 rule, which is that the distance to the nearest element in the photographed scene should be about 30 times as long as the baseline, or the distance between the centers of the camera lenses (corresponding of course to the distance between your eyes' pupils).

This makes some evolutionary sense. Human eyes have an average baseline of a little over 6 cm, and in a life-or-death struggle on the savanna, the opponent maneuvering a couple of meters away from you is the one demanding your brain's full spatial-reasoning capability.
A tip: you can follow the 30:1 rule without doing any math. Most of us are familiar with what a centimeter looks like, and what a foot looks like; if you consider the distance to subject in feet, and the baseline in centimeters, your conversion is essentially 1:1.

Still, the "rule" is just a rough, easy to remember guideline. There is nothing strict about it. Best to consider it a starting point for composing stereo photographs. If you diverge too much from it in one direction, you'll lose your stereo effect because the images are too much alike; miss too far in the other direction and your image pair will be confusing and possibly even painful to look at. But there's always some leeway. Also some scenes benefit from bending the rule in a particular direction. "Framing" elements in the periphery of a scene can sometimes work well at 15:1 or 10:1; conversely, in a scene with a lot of fine detail, or if the background is unusually far away from the subject, you might want to narrow the angle, using a ratio of 50:1 or more. You're in the age of digital photography, so experimentation costs you nothing but time.
So you have a pair of pictures taken from slightly different perspectives, and you've arranged them in a crossview: right image on the left, left image on the right. Maybe you've touched up rotation and centering; you've got the start of a 3D illusion, but you suspect it could be better. What now?
There are two conditions I try to satisfy when processing stereo pairs to share with the world. I'll lay them out quickly here, then go into each with examples.
Before going farther, it should be mentioned that software is available to partly/mostly automate the alignment process. The best known such package is Stereo Photo Maker (MS Windows only). This guide is for those who like to get their hands dirty, or maybe want to explore the process first and do it the easy way later. Also we assume you already have some basic familiarity with image editing concepts. This won't teach you how to use GIMP or Photoshop.
Here is a scene with a "window violation." Its otherwise acceptable depth illusion falters when the eye approaches the bottom right corner.

Our subjective expression of the stereo window rule was, everything should appear behind the window frame, not in front of it. Notice that the white blossoms along the left edge already appear to be aligned with the frame there; what we have in the lower right is clearly closer than that, so we must be in violation.
But for the sake of beating the point into abject submission, let's also consider the objective expression of the rule: pairs of common elements should not be placed further apart than the horizontal offset between the images. We pick a common element that is as far foreground as possible – the front edge of one of the concrete seams will do – and measure the distance between its two appearances, then compare to the image offset most easily measured at a corner. 540 > 500, confirming that we have broken the rule here.
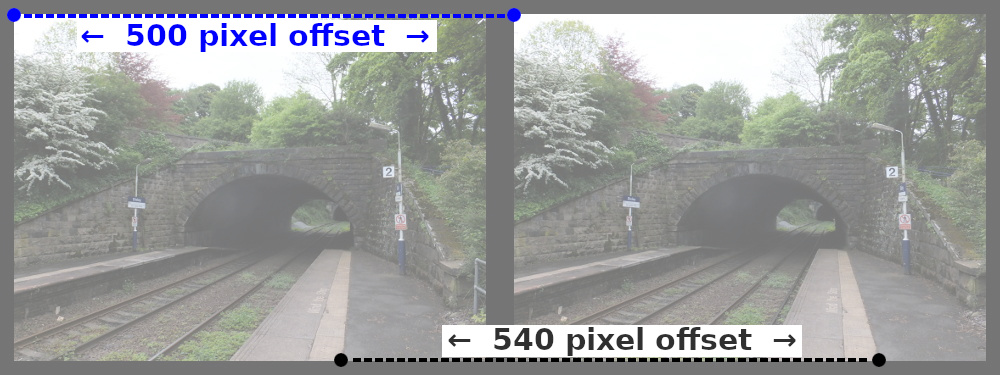
The solution is to crop one image on the right and the other on the left by the same amount; 40 pixels sounds about right, wouldn't you say? In the process we'll lose the distracting bit of handrail.


A couple of technical flaws remain that are worth mentioning now even if they are unrelated to alignment. One is a raindrop near the center of the lens, and maybe we can't do much about that. The other flaw resulted from a gust of wind hitting some foilage atop the bridge, causing what we call rivalry: incompatible information telling your visual cortex both pictures can't be true at the same time. To be fair, since this was shot with a single camera in cha-cha style, they weren't true at the same time! But the illusion can be improved by simply copying a small part of one image over the other.

If you use a general-purpose image editor to process stereo pairs, it's possible that you will be working with the two images in layers before putting them side by side. With that in mind, here is an easy way to know whether you have established the stereo window properly: toggle the visibility of the top layer to repeatedly flip between the two images, essentially making an impromptu wigglegram, and look for a "pivot point" -- a depth in the scene where things stand still, almost as if you had stuck a pin there.
Here we see the original, un-aligned pair in the previous example. The pivot point is off in the middle distance. Although it makes for an attractive wigglegram, it predicts a broken window frame in a true stereo view.

After our crop, the scene pivots from the extreme foreground. Now we know everything will appear behind the window frame.

Here is an image pair that violates the horizontal-lines rule. Although the 3D illusion is plausible, it is uninviting and fatiguing, especially when you try to look at the corners.

Let's see what is wrong by drawing lines connecting a few common elements. In a perfectly aligned image pair, these lines would all be exactly horizontal.
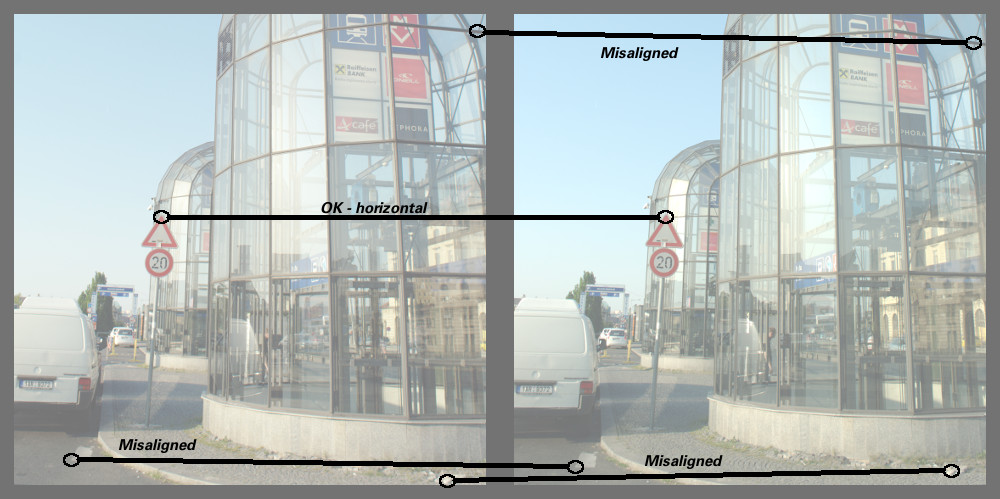
What we are looking at is classic keystone effect caused by camera toe-in. Some careful work with an image editor (in this case, the GIMP perspective tool), followed by a modest vertical crop, helps to rectify things:

Now you can crossview the scene without discomfort, letting your eyes wander anywhere in the frame.
Making perspective adjustments is not a trivial exercise; it is probably worth its own tutorial. But you might find the wigglegram trick (see section above) useful here. Alternating between layer views, if you see an element moving somewhat diagonally rather than sideways, it's an indication you should make an adjustment. I like to superimpose a faint grid on my editor view while touching up one element from as close to each of the four corners as possible; once those four elements can be seen to "wiggle" on good horizontal paths, the rest of the picture usually takes care of itself unless there is some other significant geometric flaw in play, such as barrel/pincushion distortion from the lens, or perhaps a shooting baseline that was not horizontal to start with.
Although the above explanations and illustrations above are obviously tailored for crossview work, much of the content applies to stereography in general, regardless of the chosen presentation format.
